Descriptive Geometry DWG Full Project for AutoCAD
Geometry is a job where there are all projections of a body.
Drawing labels, details, and other text information extracted from the CAD file (Translated from Spanish):
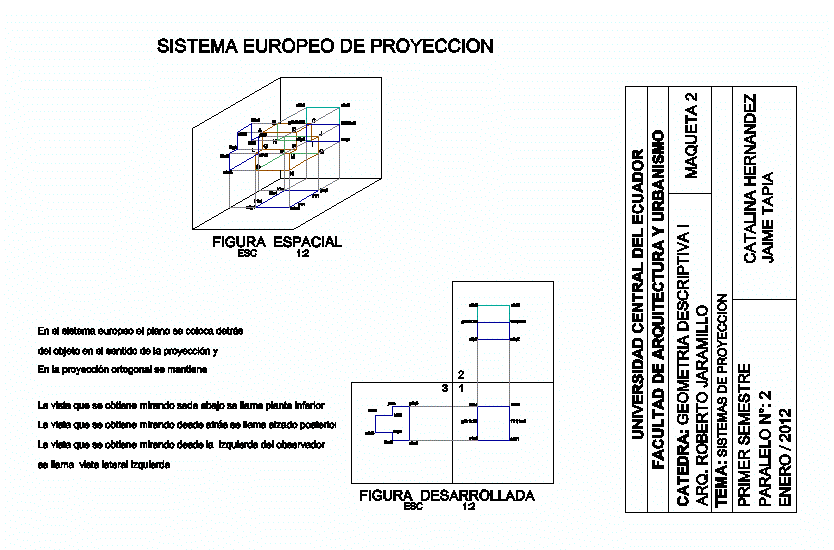
European projection system, American projection system, American projection system, European projection system, American projection system, European projection system, Central university of ecuador, Faculty of architecture urbanism, model, first semester, Catalina hernandez jaime tapia, Projection systems, Catedra: descriptive geometry, Arq. Roberto jaramillo, parallel, January, Central university of ecuador, Faculty of architecture urbanism, model, first semester, Catalina hernandez jaime tapia, Projection systems, Catedra: descriptive geometry, Arq. Roberto jaramillo, parallel, January, Space figure, Esc, Space figure, Esc, Developed figure, Esc, Developed figure, Esc, The view that is obtained looking from the front is called elevated frontal view, The view that is obtained looking from above is called plant, The view obtained from the left-hand side of the observer is called the lateral view, The view that is obtained looking from behind is called rear elevation, The view that is obtained looking from below is called lower plant, In the American system the projection plane is placed before the object in the sense of the, The despondence is always made leaving the elevation as main view that is to say the others fall in, Around the elevation. Being the elevation in front of the other views must rotate as, Appears on the model, In the European system the plane is placed behind the object in the direction of the projection in the orthogonal projection is kept the view that is obtained looking down seat is called lower plant the view that is obtained looking from behind is called rear elevation the view that Is obtained looking from the left of the observer is called left lateral view, In the American system the plane of projection is placed in front of the object in the direction of the projection the dejection is always made leaving the elevation as the main view, that is to say, the others collapse around the elevation. Being the elevation in front of the other views must rotate as it appears in the model, The view that is obtained looking from the front is called elevated frontal view the view that is obtained looking from above is called plant the view that is obtained looking from the right of the observer is called lateral view right
Raw text data extracted from CAD file:
| Language | Spanish |
| Drawing Type | Full Project |
| Category | Drawing with Autocad |
| Additional Screenshots |
 |
| File Type | dwg |
| Materials | Other |
| Measurement Units | |
| Footprint Area | |
| Building Features | |
| Tags | autocad, body, descriptive, DWG, full, geometry, job, Project, projections |

